Syllabus is found here
88
Welcome back! Below is an introduction to what class will look like for the remainder of the year. If it doesn't answer all your questions please send me an email. Here's to moving ahead and learning new skills!
WHERE ARE MY ASSIGNMENTS?
Look for the links that are pasted below these instructions.
WHAT AM I GOING TO BE DOING?
Assignments will be mostly drawing projects that last about a week. Some will be a little longer, others a little shorter. Since each day is allotted 25 minutes of instruction, it will take you awhile to read the instructions and then start the project. You can work at your own pace and then turn it in on the due date. The deadlines for projects will be 11:59 p.m. on the day it’s due (I know some of you procrastinators will want to know that.)
If you are in the middle of working on a project and get stuck or frustrated, send me an email with a photo of your work. I can help you!
WHAT MATERIALS DO I USE?
For Studio Art 1, the majority of assignments for the rest of the semester will be drawing. No mechanical pencils. No. 2 pencils will work, and if you have a set of art pencils you are more than welcome to use them; however, you do not need to buy some.
WHAT DO I DRAW ON?
Hopefully you have your sketchbook with you. If you don’t, you can draw assignments on white 8”x11” unlined paper (think printer paper). Just be careful because thin paper like printer paper will tear very easily.
HOW DO I SUBMIT MY PROJECTS TO YOU?
- Take a QUALITY photo of your artwork (see important instructions below)
- Send the photo AS AN ATTACHMENT to your email. Do not embed it in your email as sometimes these images are distorted. Also, send your email from a computer if at all possible. There have been many instances where students send me emails from their phones and I don’t get them. And if I don’t get your email, I can’t grade your project.
- Only one assignment per email.
- Crop out any background around your artwork so all I see is the art itself.
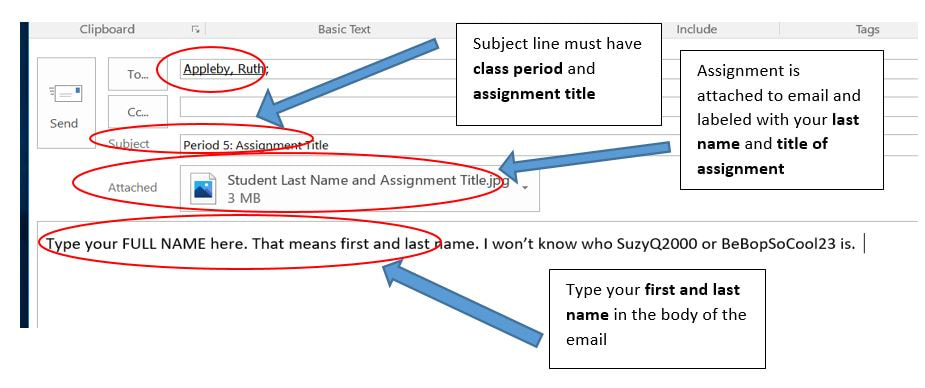
- Label your email/assignment using the following format:
HOW DO I TAKE A QUALITY PHOTOGRAPH OF MY ARTWORK?
OK, this is super important. I can’t grade what I can’t see. You don’t have to have a fancy phone or camera to take a photograph that represents your work well, but there are a few rules to follow.
The first one is pencil drawings can be notoriously difficult to photograph well. They either tend to fade out or reflect too much glare. Take multiple photos, and then ask yourself which one can I see the details the best? Which is the clearest? Is the drawing too faint and fades away?
The next rule is to ALWAYS take your photos OUTDOORS in the shade. Indoor lighting makes for a poor photo—especially pencil work. Natural lighting, a.k.a the sun, is the best type of lighting for photographing your artwork. However, if you take a photo in bright, direct sunlight it will make your work difficult to see. Cloudy days, where the sunlight is filtered, are by far the best for quality photos. If you need to take photos, but it’s not a cloudy day, find a spot outside where there are some light shadows, and photograph your work there.
ASSIGNMENTS:
1) PRACTICING VALUE AND SHADING
2) APPLE DRAWING
3) FULL VALUE DRAWING
4) CRUSHED CAN CHALLENGE
5) FACIAL PROPORTIONS AND EYES
6) DRAWING NOSES
7) DRAWING MOUTHS
8) DRAWING EARS
9) DRAWING HAIR
10 Final Portrait
